详解Go语言设计模式之单例模式
单例模式的概念
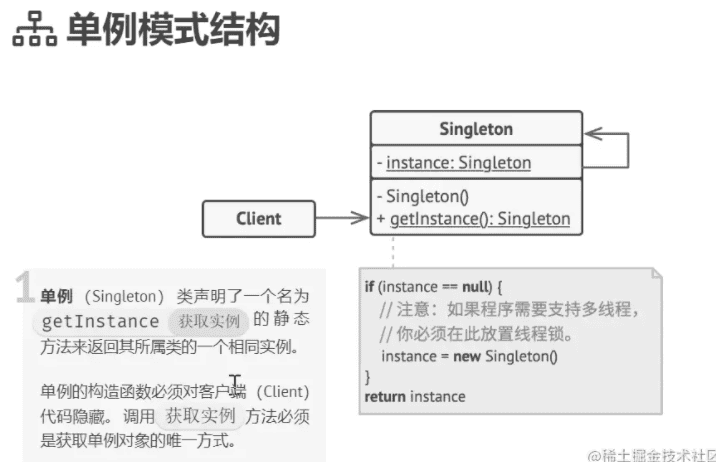
单例模式很容易记住。就像名称一样,它只能提供对象的单一实例,保证一个类只有一个实例,并提供一个全局访问该实例的方法。
在第一次调用该实例时被创建,然后在应用程序中需要使用该特定行为的所有部分之间重复使用。
单例模式结构

单例模式的使用场景
你会在许多不同的情况下使用单例模式。比如:
- 当你想使用同一个数据库连接来进行每次查询时
- 当你打开一个安全 Shell(SSH)连接到一个服务器来做一些任务时。 而不想为每个任务重新打开连接
- 如果你需要限制对某些变量或空间的访问,你可以使用一个单例作为 作为这个变量的门(在 Go 中使用通道可以很好地实现)
- 如果你需要限制对某些空间的调用数量,你可以创建一个单例实例使得这种调用只在可接受的窗口中进行
单例模式还有跟多的用途,这里只是简单的举出一些。
单例模式例子:特殊的计数器
我们可以写一个计数器,它的功能是用于保存它在程序执行期间被调用的次数。这个计数器的需要满足的几个要求:
- 当之前没有创建过计数器
count时,将创建一个新的计数器count = 0 - 如果已经创建了一个计数器,则返回此实例实际保存的
count数 - 如果我们调用方法
AddOne一次,计数count必须增加 1
在这个场景下,我们需要有 3 个测试来坚持我们的单元测试。
第一个单元测试
与 Java 或 C++ 这种面向对象语言中不同,Go 实现单例模式没有像静态成员的东西(通过 static 修饰),但是可以通过包的范围来提供一个类似的功能。
首先,我们要为单例对象编写包的声明:
package singleton

type Singleton struct {
	count int
}

var instance *Singleton

func init() {
	instance = &Singleton{}
}

func GetInstance() *Singleton {
	return nil
}

func (s *Singleton) AddOne() int {
	return 0
}
然后,我们通过编写测试代码来验证我们声明的函数:
package singleton

import (
	"testing"
)

func TestGetInstance(t *testing.T) {
	count := GetInstance()

	if count == nil {

		t.Error("A new connection object must have been made")
	}

	expectedCounter := count

	currentCount := count.AddOne()
	if currentCount != 1 {
		t.Errorf("After calling for the first time to count, the count must be 1 but it is %d\n", currentCount)

	}

	count2 := GetInstance()
	if count2 != expectedCounter {
		t.Error("Singleton instances must be different")
	}

	currentCount = count2.AddOne()

	if currentCount != 2 {
		t.Errorf("After calling 'AddOne' using the second counter, the current count must be 2 but was %d\n", currentCount)
	}
}
第一个测试是检查是显而易见,但在复杂的应用中,其重要性也不小。当我们要求获得一个计数器的实例时,我们实际上需要得到一个结果。
我们把对象的创建委托给一个未知的包,而这个对象在创建或检索对象时可能失败。我们还将当前的计数器存储在变量 expectedCounter 中,以便以后进行比较。即:
	currentCount := count.AddOne()
	if currentCount != 1 {
		t.Errorf("After calling for the first time to count, the count must be 1 but it is %d\n", currentCount)

	}
运行上面的代码:
$ go test -v -run=GetInstance .
=== RUN   TestGetInstance
    singleton_test.go:12: A new connection object must have been made
    singleton_test.go:19: After calling for the first time to count, the count must be 1 but it is 0
    singleton_test.go:31: After calling 'AddOne' using the second counter, the current count must be 2 but was 0
--- FAIL: TestGetInstance (0.00s)
FAIL
FAIL    github.com/yuzhoustayhungry/GoDesignPattern/singleton   0.412s
FAIL
单例模式实现
最后,我们必须实现单例模式。正如我们前面提到的,通常做法是写一个静态方法和实例来检索单例模式实例。
在 Go 中,没有 static 这个关键字,但是我们可以通过使用包的范围来达到同样的效果。
首先,我们创建一个结构体,其中包含我们想要保证的对象 在程序执行过程中成为单例的对象。
package singleton

type Singleton struct {
	count int
}

var instance *Singleton

func init() {
	instance = &Singleton{}
}

func GetInstance() *Singleton {
	if instance == nil {
		instance = new(Singleton)
	}

	return instance
}

func (s *Singleton) AddOne() int {
	s.count++
	return s.count
}
我们来分析一下这段代码的差别,在 Java 或 C++ 语言中,变量实例会在程序开始时被初始化为 NULL。 但在 Go 中,你可以将结构的指针初始化为 nil,但不能将一个结构初始化为 nil (相当于其他语言的 NULL)。
所以 var instance *singleton* 这一语句定义了一个指向结构的指针为 nil ,而变量称为 instance。
我们创建了一个 GetInstance 方法,检查实例是否已经被初始化(instance == nil),并在已经分配的空间中创建一个实例 instance = new(singleton)。
Addone() 方法将获取变量实例的计数,并逐个加 1,然后返回当前计数器的值。
再一次运行单元测试代码:
$ go test -v -run=GetInstance .
=== RUN   TestGetInstance
--- PASS: TestGetInstance (0.00s)
PASS
ok      github.com/yuzhoustayhungry/GoDesignPattern/singleton   0.297s
单例模式优缺点
优点:
- 你可以保证一个类只有一个实例。
- 你获得了一个指向该实例的全局访问节点。
- 仅在首次请求单例对象时对其进行初始化。
缺点:
- 违反了单一职责原则。 该模式同时解决了两个问题。
- 单例模式可能掩盖不良设计, 比如程序各组件之间相互了解过多等。
- 该模式在多线程环境下需要进行特殊处理, 避免多个线程多次创建单例对象。
- 单例的客户端代码单元测试可能会比较困难, 因为许多测试框架以基于继承的方式创建模拟对象。 由于单例类的构造函数是私有的, 而且绝大部分语言无法重写静态方法, 所以你需要想出仔细考虑模拟单例的方法。 要么干脆不编写测试代码, 或者不使用单例模式。
以上就是详解Go语言设计模式之单例模式的详细内容,更多关于Go语言 单例模式的资料请关注其它相关文章!


